Thursday, January 31, 2013

Fred She Said Tulips

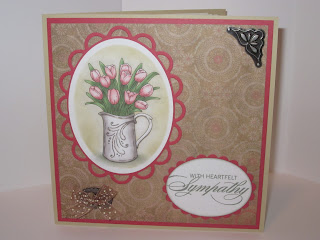
Two of my very dear friends, Nancy and Crystal, are both members of the Fred, She Said Design Team. Fred, She Said Digital Designs has an amazing collection of digital stamps. I have been admiring Nancy and Crystal's work for the past several months, and had even purchased a few digital stamps of my own. If I am being 100% honest though, I must admit that I had never actually used any digital stamps until this week, but now that I have used them, I am totally hooked!

First of all, the designs are GORGEOUS! There is a wide variety of subject matter, and I haven't yet seen an image that I didn't like! You can use the images to meet your needs because they aren't subject specific.

Second, you when you purchase the designs, many of the designs come as pre-colored images! The images come in a variety of different colors in one file, so you can pick and choose the colors that best match your paper.

Finally, with the use of Nestabilities dies, it's super easy to cut the image out after it has been printed.

Last weekend, my sister in law lost her 91 year old grandmother. Since we are very close to their family, I needed three sympathy cards! One for her, one for her daughter, and one for her mother. Enter Fred-She Said Designs! I was able to create three sympathy cards, each with a different look, all in about an hour and a half! I used the same image in three different colors, and used matching CMTH paper packs, ribbon, and embellishments. I have a feeling I am going to be making tons more cards with digital images in the very near future!!!


Wednesday, January 30, 2013

Avonlea Display Frame

This year, I decided to make a Christmas gift for my best-est friend, Michele. She is always so sweet and thoughtful. I honestly do not know what I would ever do without her. I'm so thankful to have her in my life! The one thing that makes her so special is that she loves her girls so much that I wanted to make something she could display in her home that would showcase her girls. She has two daughters of her own and a niece that she is raising along with her mother-in-law as if she were her own daughter. The display frame was a perfect fit! I secretly approached her oldest daughter in order to get some recent photos of the girls for this project. She was a huge help!

Back to the project itself...a few months ago, the uber-talented CTMH Consultant, Lisa Stenz, put together a display tray kit for her customers. I loved her work so much that I ordered the kit from her, knowing that I wanted to use it for Michele's gift. It uses the Avonlea paper pack, along with some other wonderful items. The colonial white rosette ribbon and the slate polka dot ribbon add a lot to the project. The dimensional flowers were all cut with the CTMH Artiste Cricut Cartridge. The Avonlea canvas complements bring this whole project together! I hope you like the finished frame as much as Michele did....love you bunches, my BFF!!!


Tuesday, January 29, 2013

Crafts in my Classroom

As many of you know, I have been an elementary classroom teacher for the past thirteen years. This past year I was moved from my former position as a technology teacher into a third grade classroom because of budgetary constraints. If any of you have ever set up a new classroom, you know it can be a HUGE undertaking.

Over the summer, I used some of my craft-sense to make a few items for my classroom that I thought would help make things run a lot more efficiently for the students. This post contains three of my favorite projects from this undertaking...

The first photo is an altered clipboard that hangs on our classroom window directly outside of the room. There are tons of cards that can be hung on the clothespin to indicate where we are when we are not in the classroom. I used the retired CMTH paper pack called Magic Moments, and a bunch of adorable buttons. I painted the clothespin black and hot-glued it to the board. VIOLA!

The next photo is the front of my desk. We use this to keep track of our lunch count each day. Each student has a number assigned to him/her for the entire year. As the students come into the classroom, they move the bottle cap with their number to the appropriate lunch choice. I used patterned 'duck tape' to make the sections on the desk. Since my desk is magnetic, I put small adhesive magnet discs on the back of each bottle cap, which made this a functional space! It takes me only seconds to count the lunch choices each day instead of the much larger amounts of time it used to take!

Finally, I've included a photo of the super-cool cookie sheet that is right next to our classroom door. As the students leave the room, they move their bottle cap to the destination where they can be found. This eliminates any questions if a student is missing from the classroom. It also cuts down on the constant questions to go to the bathroom, get a drink, go to the nurse, etc. There are rules for when students are permitted to leave and how many students can be out at a time, and they do a really good job keeping up with the rules. The sections were created with black shimmer tape. The labels for this and for the front of my desk were made using CTMH Roxie paper.

The students seem to really enjoy each of these items and they have definitely gone a long way toward helping with classroom management.


Monday, January 28, 2013

Resolutions and New Starts

Hey there! Remember me?!? I know it's been ages since I've last posted here. I have a lot of different directions I could go with this post. I can apologize and make excuses. I could tell you all of the reasons I haven't posted since last July (YIKES!) but I am not going to do that. I've decided that starting with this year, I no longer want to look backward, rather look forward.

Like most of you, I decided to make a New Year's Resolution. Of course, I always say that I want to make healthier choices, lose weight, and exercise more (which I still am working hard to do), but I really wanted to make a resolution this year that I thought I actually had a chance to keep. So...my resolution deals with all of you and with this blog...

This year, I resolve to commit myself to at least four blog posts a month. (I find that this is rather convenient today, since there are only four days left in January!) I refuse to let this one fail before the month of January is over! I have been taking photos and have been squeezing in some craft time over the past few months. Now, I just need to take the time to post what I've been doing. I am hoping that once I create a 'blogging habit' that more than four posts will be posted each month.

So...here goes nothing!!!

This first post for January is my 2012 Christmas Card. I made 80 of these little guys and I was worried that this would end up being the first year my cards didn't get finished in time for Christmas since I started making my own cards in 2002. I started with CTMH die-cut cards. I just LOVE the scroll design pre-cut into the bottom of the card! I used the CTMH paper pack called Pear and Partridge. I also used the October 2012 CTMH stamp of the month Very Merry Christmas. I stamped the image three times on the ornament shape after it was cut with the Cricut Artiste Cartridge. Then I folded each ornament in half and glued them together to create the three dimensional ornament. I added Cranberry Baker's Twine for the ribbon on top, and some bitty sparkles on each ornament for some bling! The finishing touch was the addition of Silver Shimmer Tape on the inside of the card. This peeks through the bottom of the card and really did a nice job finishing off the card.

I hope you enjoy this first post, and that you keep coming back for more! (Don't be afraid to email or message me if you feel like I'm slacking!) Sometimes, I need that extra push to keep on top of my goals!